Creating a study using Ulysses
start_study.Rmd
library(Ulysses)Introduction
Running an OHDSI study contains lots of organizational complexity in
terms of organizing code and proper documentation to communicate the
code. While examples for constructing OHDSI studies have been presented,
for example the SOS challenge, there is no clear workflow towards
developing an OHDSI study as a piece of software available in a github
repository. The OHDSI community would benefit from a workflow tool that
will help standardize the development of network studies and improve its
organization. This gap led to the development of a new R package called
Ulysses (Useful Learning Yielded Structuring and Setting
Epidemiology Studies) dedicated towards assisting in the development of
an OHDSI study.
Ulysses draws inspiration from the R package usethis, which is a
workflow tool used for the development of R packages. Similar to OHDSI
studies, there are several administrative steps and procedures required
to develop a stable and transparent R package. usethis
helps R programmers navigate R package development by supplying
functions that automate simple tasks or other useful steps needed to
meet this goal. Ulysses can provide a similar solution for OHDSI
studies, improving the organization, communication and development of
OHDSI studies by supplying simple functions to guide developers towards
a study that is transparent, robust and reproducible. The OHDSI
community would benefit from a tool that enforces standards and
organization in OHDSI studies because it makes it easier for study nodes
to execute network studies from a recognizable structure and provide
guidance to new researchers seeking to build an OHDSI study if they
follow a common workflow. In this software demo, we will showcase an
example of how Ulysses can be used to start a new OHDSI study and help
initiate necessary tasks for organizing and communicating the study to
the OHDSI data network.
In this vignette we walk-through how to build an OHDSI study using
the Ulysses package. We review:
- Initializing a study in R
- Adding repo documentation
- Handling database credentials
- Adding R scripts
- Providing documentation about the study
Initializing an OHDSI study in R
Once you have downloaded the Ulysses package, you can
begin creating an OHDSI study. To do this, you can run code as shown in
the block below:
newOhdsiStudy(
  path = here::here("my_ohdsi_study"),
  studyInfo = setStudyInfo(id = basename(here::here("my_ohdsi_study")),
                           title = "My OHDSI Study"),
  authors = setStudyAuthors(
    developer = "John Smith",
    developerEmail = "john.smith@ohdsi.org"
  ),
  about = setStudyDescription(
    desc = "This is an OHDSI study for characterizing a population. This is an example.",
    ta = "Cardiovascular",
    dataSources = list("Synthea", "Synpuf")
  ),
  tags = setStudyTags("OHDSI", "OMOP")
)
This function will print some information to your console about start-up tasks and open an R project in a new session, for details on Rstudio projects see link.
The additional inputs of the newOhdsiStudy function
build meta data for the study repository that will be stored in a
_study.yml file. This meta data serves two purposes: 1)
provides human-readable information about the study and 2) serves as a
source of information to populate fields for templated files generated
using Ulysses. For example, if we were to generate a
README file using Ulysses it would be built
using this meta information.
Ulysses Directory structure
In a new R session, users will notice a pre-populated directory structure in their project folder. This directory structure contains specific folders and files that are important for a study to be self-contained within the new R project.
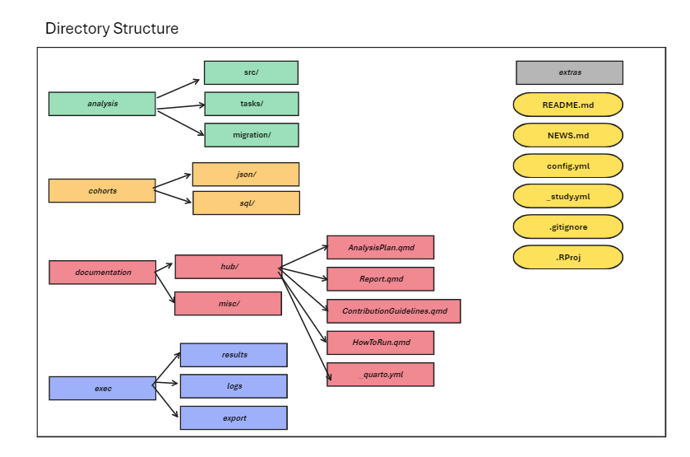
Ulysses builds the following folders:
analysis
The analysis folder contains files that correspond to study analysis. There are three main folders created.
-
src- contains the underlying functions that execute the analysis. These files can be R scripts, sql files or python scripts, for example. WithUlysses, users can generate templated internal R files using the commandmakeInternals. -
tasks- hold the executing scripts that generate the results of the study. WithUlysses, we think of studies as a series of tasks implemented in a specific order, like a pipeline. Thetasksfolder organizes these individual tasks. WithUlysses, users can generate templated internal R files using the commandmakeAnalysisScript. -
migrations- contain post-processing scripts to move and prepare data from a series of results to a format that is “presentation ready”. When conducting studies in OMOP, it is common to run the same analysis on different databases. Migration scripts help bind the results of all databases run in the study and format tables to present in a quarto report or shiny app. WithUlysses, users can generate templated internal R files using the commandmakeMigrationScript.
cohorts
The cohorts folder is meant to organize files that are used to
generate cohort definitions in the database. In an OHDSI study, cohort
definitions are specified in a json file format following
the specifications of circe-be. We
suggest placing cohorts used in the analysis in the cohort folder in
order for the study to be self-contained, meaning it does not rely on
ATLAS to execute. However, we highly recommend that
users maintain the organization of their cohorts in ATLAS as a source of
truth for both cohort definition and generation. The sql
folder is created to store sql files used to build cohort definitions.
This is a good location for cohort definitions that do not follow the
circe-be structure.
Keeping track of cohorts can be a bit tricky. Ulysses
provides a helper function to track json files in the cohorts folder
called cohortManifest. This function will list the name of
the json file and its corresponding id. By default, the cohort Id
assigned to the cohort json is in alphabetical order starting with 1.
Ulysses also creates a file called the
CohortDetails.qmd which prints the human-readable rendering
of the json expression using CirceR.
These functions are still in development as of
v0.0.4.
documentation
Study repositories should not only contain code, they should also
contain documentation about the design of the study and how to run the
study. Study repo’s should be self-contained, meaning we can go to one
location to get all code and human-readable documentation about the
study. Ulysses builds this into its repository structure
with a hub folder and a misc folder. The
hub folder contains files that are specific to the study
hub, an html website that provides all information about the study. The
misc folder is a place-holder to store word documents,
excel files, slide decks or other important documentation needed for the
study.
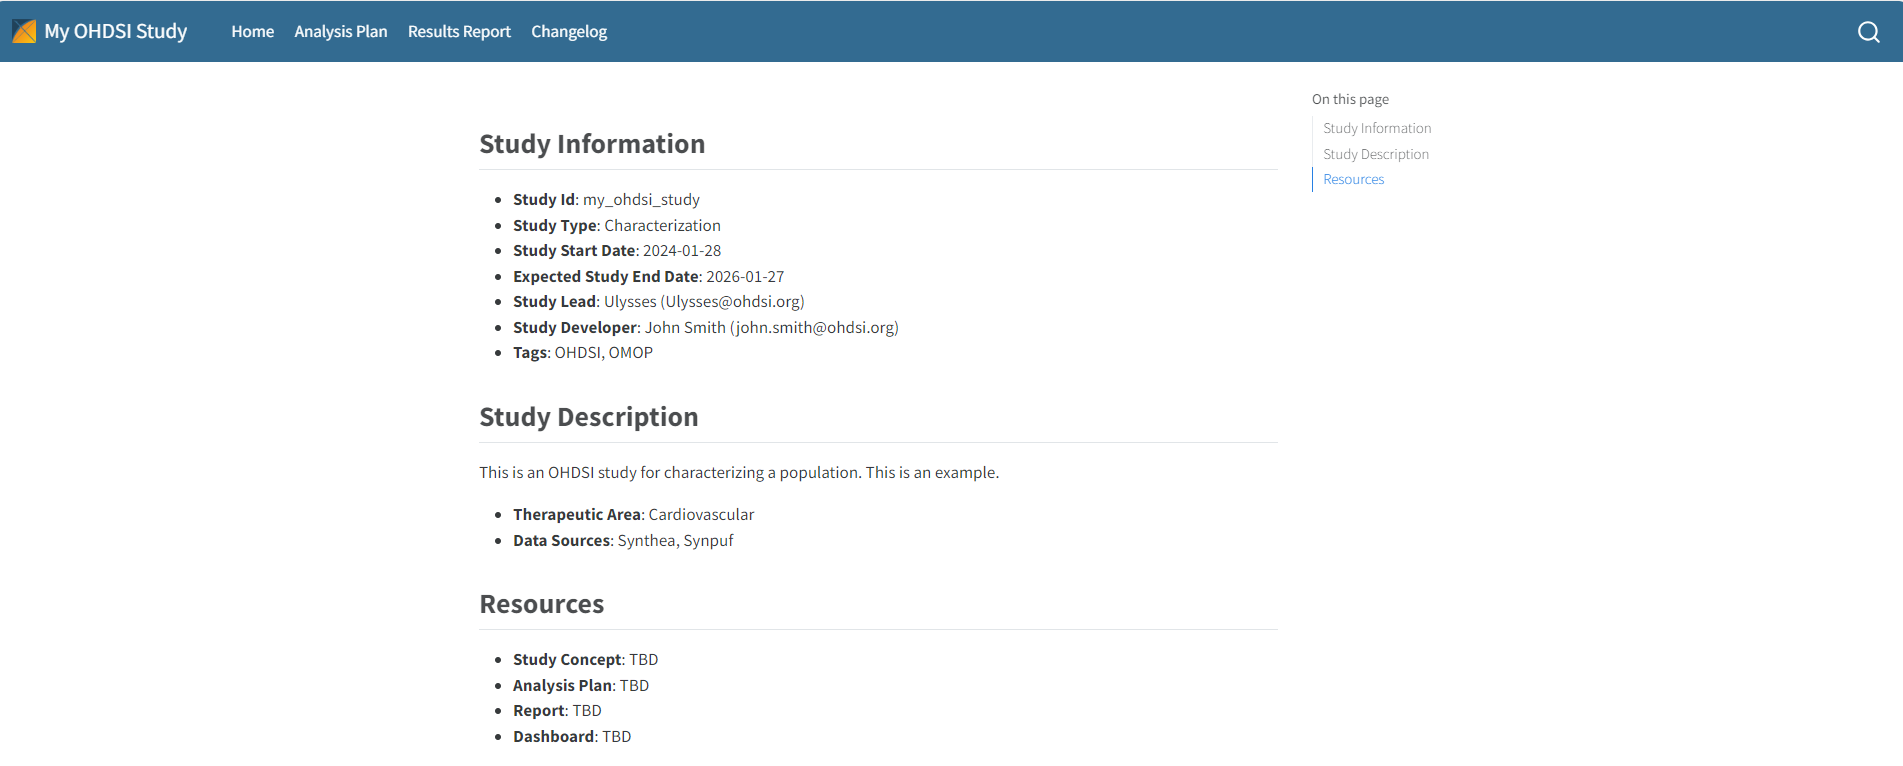
Study Hub
The study hub is a website that a user can generate through
Ulysses that provides information about the design of a
study and its results. The study hub is generated using
quarto. The study hub can be generated using the function
buildStudyHub. The study hub relies on the generation and
maintenance of 4 files: README.md, NEWS.md, AnalysisPlan.qmd and
ResultsReport.qmd.
Suggested Files
Ulysses has functions to initialize some suggested files
for a study:
-
AnalysisPlan.qmd: the statistical analysis plan for the study, which specifies the study design and analytical methods. This file can be templated inUlyssesusing the commandmakeAnalysisPlan. -
ResultsReport.qmd: the report summarizing results from the study following its execution. This file can be templated inUlyssesusing the commandmakeResultsReport. -
ContributionGuidelines.qmd: if the study is a network studies, maintainers should provide resources on how others can contribute to the study. Topics ranges from how to file issues, how to send results to the study host, and how to collaborate in a positive environment. This file can be templated inUlyssesusing the commandmakeContributionGuidelines. -
HowToRun.qmd: a document that explains how to execute the study code to study nodes or interested parties. Should describe technical requirements needed prior to running the study, local setup, and execution. This file can be templated inUlyssesusing the commandmakeHowToRun.
exec
The exec folder is a location to store output files that
result from the study execution. This includes results and logs from the
study run and a folder to store post-processed data called
export. The exec folder is always ignored in
git.
extras
Sometimes studies have files that don’t have a natural location from
those specified above. The extras folder is a location to
store any additional files needed to run or support the execution of the
study. This is also a good location to store internal setup scripts, but
remember to ignore them in git.
Additional Repository Files
In addition to the pre-generated folders in the new study repository,
Ulysses also helps generate additional files that should be
in the repository. Some of these key files are described below.
_study.yml
A file unique to directories initialized using Ulysses
is a metadata file called _study.yml. Using the inputs
specified in the newOhdsiStudy function, a metadata file is
populated. As mentioned this file store information about the study
directory and also uses it as inputs to templated files generated in
Ulysses. It is important to maintain this file during the
development of a study, whether that is to update default fields in the
yaml file or add information. Below is a snapshot of a
_study.yml file with the essential metadata fields.
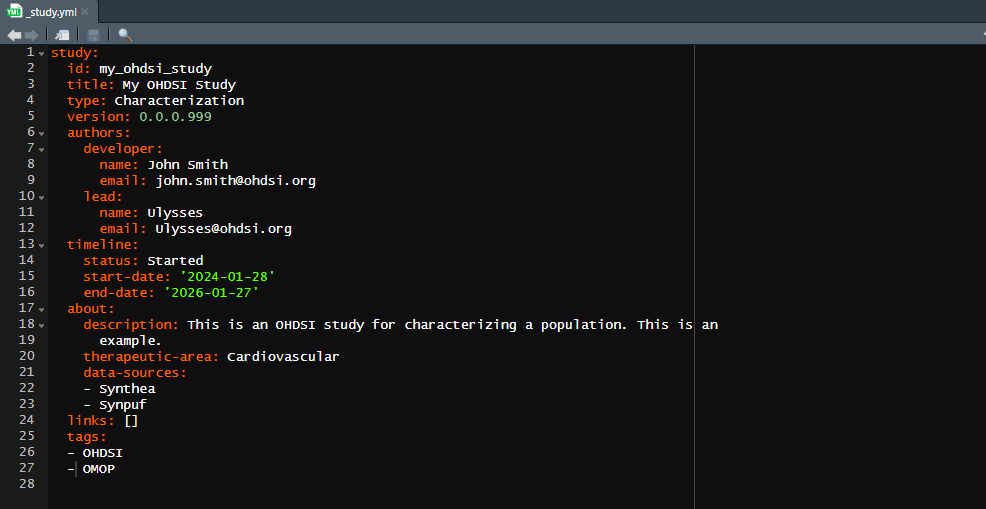
Fields
Below we describe the key fields in this file.
- id: an identifier for the study which is the same as the directory name. Use either a study id or acronym
- title: a full title for the study, more thorough than the id. If no title is provided, the input defaults to the id.
- type: a keyword describing the type of study being conducted. Could be a Characterization, Population-Level Estimation, Patient-Level Prediction, or Database Assessment, for example.
- version: a value that represents the version of the study. Suggest using semantic versioning logic.
- authors: stores the name and email of the developer (person in-charge of code development) and the lead (person in-charge of the study). You may add other authors who are designated as members
- timeline: a list of information relating to the development timeline of the study. This includes the study start and end dates. The study status is also listed here, where acceptable values are Started, In-Progress, Stopped and Completed.
- about: a short description about the study, the therapeutic area it covers and data sources used.
- links: a listing of hyperlinks to guide people to key documentation such as the analysis plan, report, dashboard and other resources.
- tags: a list of keyword identifiers for the project
Maintenance
Ulysses provides functions to maintain the
_study.yml file.
- Add Fields
- Update Fields
updateStudyEndDate()updateSutdyStatus()updateStudyTitle()updatStudyVersion()updateStudyDescription()updateTherapeuticArea()updateDeveloperInfo()updateLeadInfo()
README.md
For those unfamiliar with code development, the
README file is a standard file used to introduce the
contents of a repository, like a cover-page. It is the first file users
see when they navigate to the repository page in your repository hosting
service (i.e. BitBucket or Github). Therefore a strong README file is
essential for a study. Ulysses provides the function
makeReadMe() which initializes the README using inputs from
the metadata stored in the _study.yml.
Another feature offered by Ulysses is support for svg
badges. These simple badges appear at the top of the README and provide
useful information about the study. Badges seen in OHDSI studies include
a study status badge and badges versioning the CDM and OMOP vocabulary.
Ulysses will provide more support and documentation for
badges in the future.
NEWS.md
Another common file in software repositories is the NEWS file. The
purpose of the NEWS file is to track changes to the software over time.
Of course, version control software such as github keeps a record of the
iterations of the study as it is developed, however it is helpful to
have a “plain english” file that explains what has happened as the study
has developed over time. NEWS files are often maintained via a semantic versioning system. OHDSI studies
are not entirely software, however it is important to maintain order
over the development of the technical pieces of the study.
Ulysses offers a simple function that initiates this file,
makeNews().
config.yml
An important aspect of running an OHDSI study is handling credentials
to connect to the Database Management System (DBMS) that hosts the OMOP
data. Security of these credentials is very important.
Ulysses offers support on handling these credentials
through the config.yml file. Credentials needed to run a
study are as follows:
- dbms: the name of the dbms used to host the OMOP data
- user: your user name needed to access the data in the dbms
- password: your password needed to access the data in the dbms
-
connectionString: this string sets the connection
to the database. It will typically look something like:
jdbc:<dbms>://<server url>:<dbms port>/<database>. This string will vary from site to site. Contact your system administrator to get the information you need for this credential -
cdmDatabaseSchema: a name that defines where the
cdm tables sit for a particular database in the dbms.
Databasedefines the name of the database where the omop data sits and theSchemadefines where the cdm is within that database. In databases like sql server or snowflake this variable is often separated by a “.” i.e. `. - vocabDatabaseSchema: a name that defines where the vocabulary tables sit for a particular database in the dbms. The vocabDatabaseSchema is typically the same as the cdmDatabaseSchema, although same sites split the vocabulary into a different area.
- workDatabaseSchema: a name that defines where the work tables sit for a particular database in the dbms. The work section (referred to synonymously with scratch or write) is an area where the user is given read and write access in the database. The cdmDatabaseSchema is typically only a read-only schema, so users do not corrupt information. The workDatabaseSchema is a dedicated area where researchers can build cohort tables or other intermediary tables needed for studies. Contact your database administrator to ensure you have a dedicated workDatabaseSchema. Note this should be separate from the database schema dedicated to ATLAS.
Often times sites require additional credentials such as database
roles or other parameters used to define tempEmulationSchemas, for
example. You can add these parameters manually in the
Ulysses workflow, shown later. Be sure to contact your
database administrator to have all these credentials handy before
running a study.
Now that you have collected your credentials we need to store them
somewhere secure to be accessed continuely within the study.
Ulysses does this using a config.yml file. Yaml is a simple, readable
data-serialization language used to provide settings or configurations
for applications. For those familiar with R, the config.yml
file works similarly to an .Renviron file. But wait, there
is more to the config.yml file! The credentials are further
protected via keyring API.
keyring stores your credentials behind a password. We use
keyring and config together to ensure that
users do not accidentally expose passwords when working on a study.
Ulysses provides a function that initializes the
config.yml file:
Ulysses::initConfig(block = "example", database = "synpuf_110k", withKeyring = TRUE)When a user creates a new config.yml file it is added to
.gitignore to ensure it is not committed to a github
repository. The config file shows each credential connected to the block
name.
# Config File for my_ohdsi_study

default:
  projectName: my_ohdsi_study

# Config block for example

example:
  databaseName: synpuf_110k
  cohortTable: my_ohdsi_study_example
  dbms: !expr keyring::key_get('example_dbms', keyring = 'my_ohdsi_study')
  user: !expr keyring::key_get('example_user', keyring = 'my_ohdsi_study')
  password: !expr keyring::key_get('example_password', keyring = 'my_ohdsi_study')
  connectionString: !expr keyring::key_get('example_connectionString', keyring = 'my_ohdsi_study')
  cdmDatabaseSchema: !expr keyring::key_get('example_cdmDatabaseSchema', keyring = 'my_ohdsi_study')
  vocabDatabaseSchema: !expr keyring::key_get('example_vocabDatabaseSchema', keyring = 'my_ohdsi_study')
  workDatabaseSchema: !expr keyring::key_get('example_workDatabaseSchema', keyring = 'my_ohdsi_study')
If we wanted to add another credential in this block we can add new
line beneath workDatabaseSchema. Be sure to keep the
indentation and add an extra space after. To set up the keyrings,
Ulysses also supplies a helper script to set this up.
Follow the script to set up the keyring credentials so that the
config.yml can be properly used.
Ulysses::makeKeyringSetup(configBlock = "example", database = "synpuf_110k")